Configure Remote User Access using OpenVPN
Introduction
Besides being able to use PPTP and L2TP with IPsec you can now also use OpenVPN for Remote User Access to your LAN.
This article describes how to configure your Peplink router and a Windows 10 client for remote User Access using OpenVPN.
Configuring your Peplink router
Log on to the web admin interface of the Peplink router.
On Balance models, navigate to Network > Remote User Access.
On MAX models, navigate to Advanced > Remote User Access.
The following menu will appear:

- Select OpenVPN
- Select the WAN interface and IP addresses where the OpenVPN server of the router should listen on.
- Select the client network (LAN subnet) that the remote user is allowed to connect to (this requires a DHCP server to offer IP addresses).
- Enter 1 or more Username(s) and password(s) for the Remote User
- Save and Apply the Changes
Note:
The username must contain lowercase letters, numerics, underscore(_), dash(-), at sign(@), and period(.) only.
The password must be between 8 and 12 characters long.
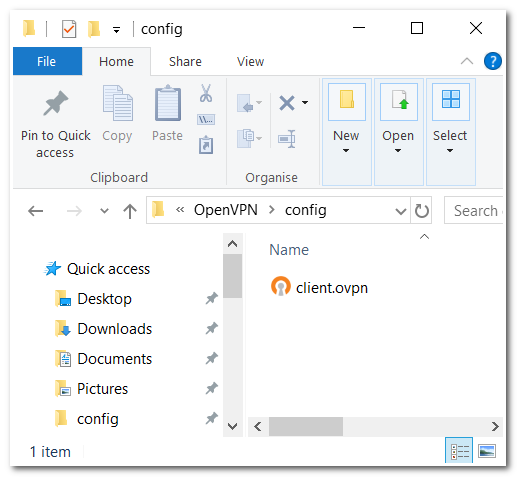
- Navigate to Status > Device
- Download and save the OpenVPN Client Profile.
You have a choice between 2 different OpenVPN Client profiles.
- “route all traffic” profile
Using this profile, VPN clients will send all the traffic through the OpenVPN tunnel - “split tunnel” profile
Using this profile, VPN clients will ONLY send those traffic designated to the untagged LAN and VLAN segment through the OpenVPN tunnel.

Configuring a Windows 10 client pc
Download the OpenVPN windows installer of choice from:
https://openvpn.net/community-downloads/
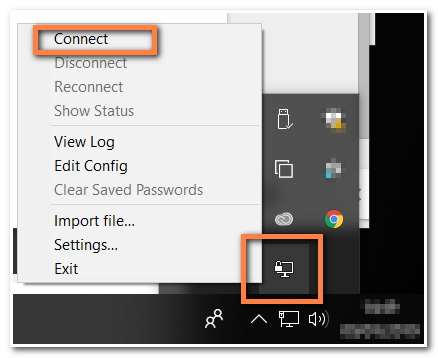
Run through the OpenVPN Setup Wizard and click Finish.


Related Articles
How To Generate a Remote Access Link
1. Navigate to https://yourpbxFQDN.com/#/office/dashboard 2. Click "Remote Access" 3. Click "Generate Link" 4. Click this icon.How to Add a New User to Telin One
1. Navigate to https://console.telin.one/ 2. Click "Manage Users" 3. Click "Add User" 4. Fill in the "User Name" field. 5. Fill in the "First Name" field. 6. Fill in the "Last Name" field. 7. Fill in the "User Email" field. 8. Fill in the "Password" ...Creating an IPSEC on fortigate
1. Login to the FortiGate and go to VPN -> IPsec Tunnels, then select "Create New" 2. Start off using the Site-to-Site configuration, this will automatically create Static Routes and Policys for you. 3. Enter the IP address of your Telin hosted PBX. ...One Fax- Branding and Domain Setup
Branding and Domain Setup This article will demonstrate how to set up your branding page and domains. First, click your initials in the bottom left part of the screen, then click branding. The customization tab allows you to add email addresses that ...Troubleshooting Audiocodes MP-202D EFAX
Functionality FMC (Fax Machine Connectors) are designed for secure communication. FMC devices differ from other Fax ATA devices in several ways: - HTTPS provides more reliable connections to VoIP protocols - HTTPS transport is not susceptible to ...